
Are you preparing for a Java developer interview and looking for common Spring Core interview questions? You’ve come to the right place! The Spring Framework, renowned for core features like Dependency Injection (DI) and Inversion of Control (IoC), remains the industry standard for building robust enterprise applications.
To help you succeed, this article bypasses the usual random trivia and organizes essential concepts into targeted architectural modules. Whether you are a beginner refreshing the basics or an experienced developer preparing for senior-level design questions, this structured breakdown will ensure you communicate your framework knowledge with absolute clarity.
Spring Core Interview Topics Covered
- 1. Spring Framework Core Concepts
- 2. Spring IoC and Dependency Injection (DI)
- 3. Spring Container: BeanFactory vs. ApplicationContext
- 4. Spring Java and XML Configuration Methods
- 5. Spring Stereotype Annotations Explained
- 6. Differences: @Component vs @Configuration
- 7. Spring @Autowired Dependency Resolution
- 8. Bean Ambiguity: @Primary vs @Qualifier
- 9. Spring Bean Scopes Tutorial
- 10. Environment Setup with Spring Profiles
- 11. Creating Thread-Safe Spring Beans
- 12. Spring Expression Language (SpEL)
- 13. Spring Property Injection (@Value)
- 14. Resolving Spring Circular Dependencies
- 15. Optimizing Startup with Spring @Lazy
- 16. Spring Externalized Configuration
- 17. Spring Boot @Conditional Annotation
- 18. Controlling Initialization with @DependsOn
- 19. Loading Files via @PropertySource
- 20. Spring Boot @ConfigurationProperties Binding
1. What is the Spring Framework, and what core problem does it solve in enterprise Java?
Spring is an open-source, modular Java framework designed to simplify the development of enterprise-level applications. Historically, Java EE (Enterprise Edition) development was heavily bogged down by complex “plumbing”—writing boilerplate code for transaction management, database connections, and lifecycle hooks.
Spring solves this by providing a comprehensive infrastructure model. By utilizing core concepts like Dependency Injection (DI) and Aspect-Oriented Programming (AOP), Spring allows developers to focus purely on business logic rather than infrastructure configuration, resulting in code that is loosely coupled, easily testable, and highly maintainable.
Interview Pro-Tip: Don’t just list features; emphasize that Spring acts as the “glue” of an application. Mention that its non-invasive nature means you can write standard Plain Old Java Objects (POJOs), and Spring will magically wire them together with enterprise services without tying your code directly to the framework’s API.
2. Explain the relationship between Inversion of Control (IoC) and Dependency Injection (DI), and the types of DI Spring supports.
Inversion of Control (IoC) is a broad software design principle where the control of object creation and lifecycle management is transferred away from the application code and handed over to a framework (the Spring Container).
Dependency Injection (DI) is the specific design pattern Spring uses to implement IoC. Instead of a class instantiating its own dependencies using the new keyword, the Spring container injects those required dependencies at runtime.
Spring supports three primary ways to inject dependencies:
- Constructor-Based Injection (Best Practice): Dependencies are provided through the class constructor. This is the gold standard because it allows fields to be declared as
final(ensuring thread-safe immutability) and guarantees the bean cannot be instantiated without its mandatory dependencies. - Setter-Based Injection: Dependencies are injected via standard setter methods after the bean is created. This is ideal for optional dependencies where a sensible default can be used if the dependency is missing.
- Field-Based Injection: Dependencies are injected directly into private fields using
@Autowiredvia Reflection.
Interview Pro-Tip: Strongly advise against Field Injection. Tell the interviewer that while Field Injection looks incredibly clean, it is widely considered an anti-pattern by senior engineers because it bypasses encapsulation, hides the class’s true dependencies, and makes writing isolated unit tests incredibly difficult without booting up the entire Spring Context.
3. How does the Spring IoC Container work, and what is the difference between BeanFactory and ApplicationContext?
The Spring IoC Container is the absolute engine of a Spring application. It reads configuration metadata (via Java annotations or classes), instantiates the defined beans, resolves their dependencies, and manages their entire lifecycle from creation to destruction.
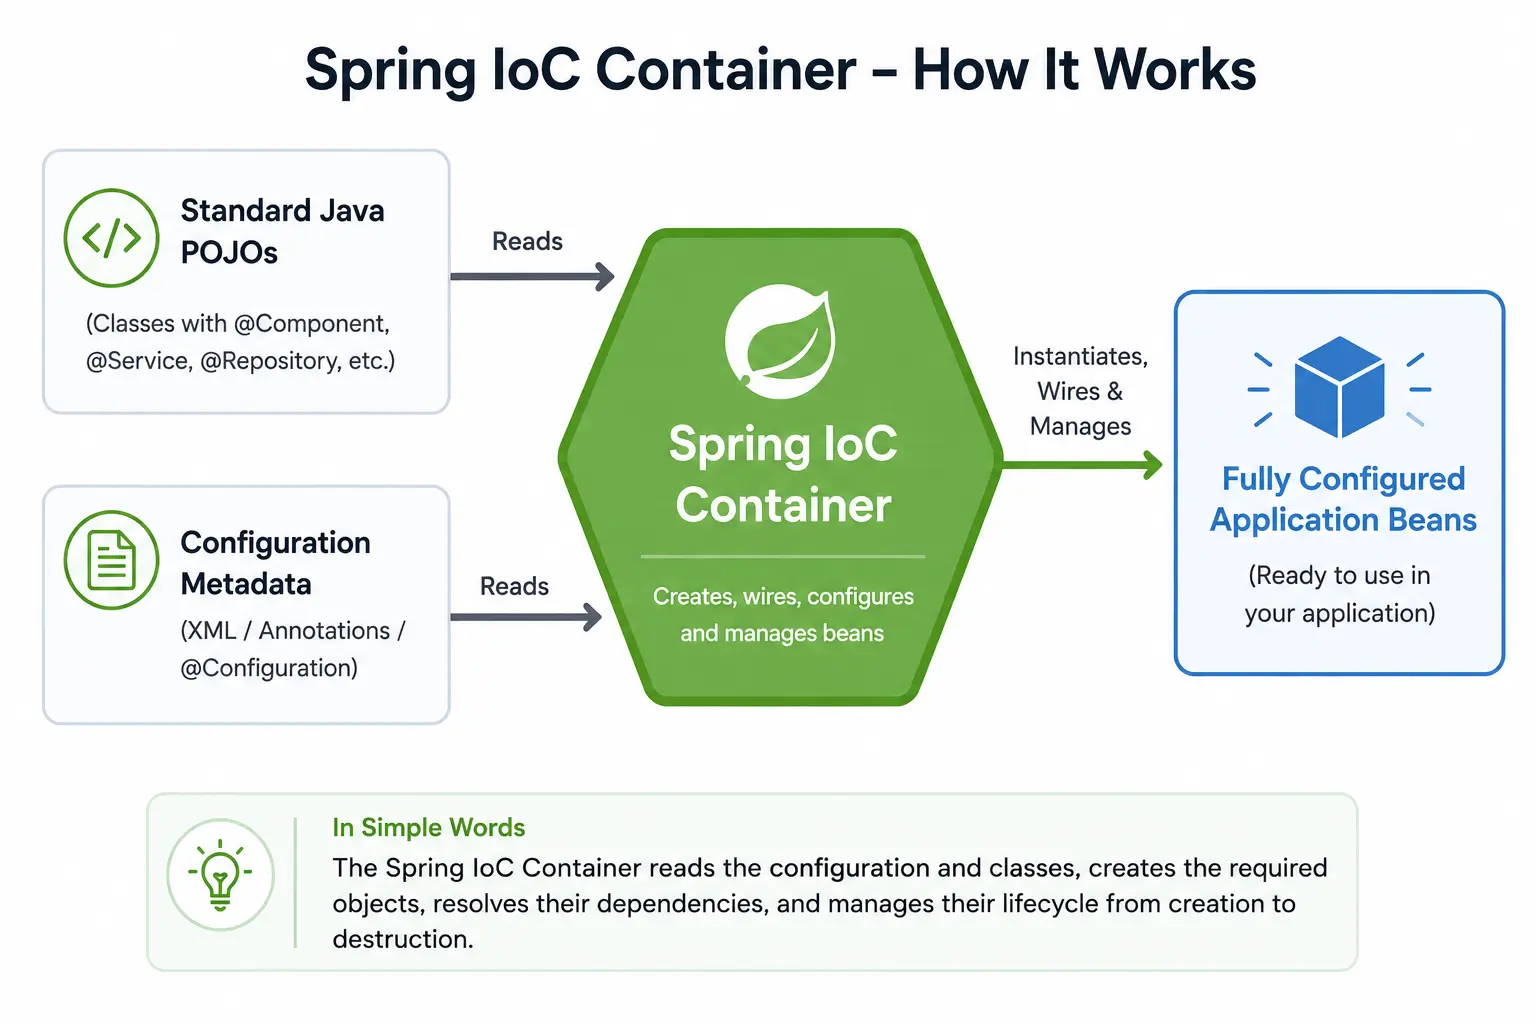
There are two main container interfaces in Spring:
BeanFactory(The Basic Container): The root interface providing fundamental bean management. It uses lazy initialization, meaning a bean is only instantiated at the exact moment it is explicitly requested. It is highly memory-efficient but lacks advanced enterprise features, making it largely obsolete for modern web applications.ApplicationContext(The Enterprise Container): A robust sub-interface ofBeanFactoryused in almost all modern Spring and Spring Boot applications. It adds features like event publishing, internationalization (i18n), and AOP integration. Crucially, it uses eager initialization for singleton beans—creating and configuring everything immediately upon application startup.
Interview Pro-Tip: Stand out by explaining why eager initialization in
ApplicationContextis so valuable. Eager initialization adheres to the “fail-fast” principle. It ensures that if there are any missing dependencies or configuration errors, the application crashes immediately on startup, rather than failing silently hours later in production when a user triggers a specific piece of lazy code.
4. What are the different ways to configure a Spring application and define custom beans?
Historically, Spring has evolved to offer three primary ways to define beans and configure the IoC container. Modern enterprise applications (especially those using Spring Boot) almost exclusively use a combination of the latter two:
- XML-Based Configuration (Legacy): Beans and their dependencies are explicitly mapped out in an external XML file (e.g.,
applicationContext.xml) using<bean>tags. While rarely used for new projects, understanding it is critical for maintaining older legacy systems. - Annotation-Based Configuration: Introduced in Spring 2.5, this allows developers to define beans by decorating the class itself with annotations like
@Component,@Service, or@Repository. Spring relies on classpath scanning (@ComponentScan) to automatically detect and register these beans during startup. - Java-Based Configuration: Introduced in Spring 3.0, this programmatic approach uses Java classes annotated with
@Configuration. Inside these classes, methods annotated with@Beanact as explicit factories to instantiate, configure, and return the bean object.
Interview Pro-Tip: A great way to demonstrate senior-level experience is to explain when to use which modern method. Tell the interviewer you prefer Annotation-based configuration for your own application code (because it is fast and concise), but you must use Java-based (
@Bean) configuration when you need to instantiate and customize objects from third-party libraries where you cannot edit the source code to add a@Componentannotation.
5. What are Stereotype annotations in Spring, and what specific behaviors do they trigger?
In Spring, a stereotype annotation is a specialized semantic marker used to define a class’s architectural role within an application. Under the hood, all stereotypes are essentially meta-annotations of the generic @Component interface. They tell the IoC container to auto-detect the class during classpath scanning.
The core stereotypes include:
@Component: The generic base annotation for any Spring-managed bean, such as utility classes or generic helpers.@Controller: Marks the presentation layer, enabling Spring MVC to route incoming HTTP requests to this class.@Service: A semantic marker for the business logic layer. While it doesn’t currently trigger unique framework behavior, it clearly signals to other developers where the core business rules live.@Repository: Marks the Data Access Object (DAO) / persistence layer.
Interview Pro-Tip: Interviewers often ask if these annotations are only for readability. This is a trap! Point out that
@Repositoryactively changes framework behavior. It triggers Spring’s exception translation mechanism, which catches vendor-specific database errors (like rawSQLExceptions) and automatically translates them into Spring’s unified, uncheckedDataAccessExceptionhierarchy.
6. What is the critical architectural difference between @Component and @Configuration?
While both annotations register beans in the Spring application context, they behave entirely differently regarding internal method calls.
@Component(“Lite” Mode): If you declare@Beanmethods inside a standard@Componentclass, calling one method from another acts like a standard Java method call. It instantiates a brand-new, unmanaged object every time it is called, completely breaking Spring’s default singleton semantics.@Configuration(“Full” Mode): This annotation is designed specifically for complex configuration classes. When Spring processes a@Configurationclass, it wraps it in a CGLIB proxy at runtime. This proxy intercepts any internal method calls to ensure that if one@Beanmethod calls another, it returns the cached singleton instance from the IoC container instead of creating a new object.
Interview Pro-Tip: The magic word here is CGLIB Proxy. Explaining that
@Configurationintercepts internal method calls to enforce singleton semantics proves you understand what the framework is doing under the hood, rather than just knowing how to use the annotations.
7. How does Spring resolve dependencies using the @Autowired annotation?
In Spring, the @Autowired annotation enables automatic dependency injection. When the IoC container initializes a bean, it scans for this annotation and automatically finds and injects the requested dependencies. Crucially, @Autowired attempts to resolve dependencies by type first.
It can be applied to three specific injection points:
- Constructors: Injects dependencies exactly at the moment of instantiation (The recommended best practice).
- Setters: Injects dependencies after the bean has been instantiated via a default constructor.
- Fields: Injects dependencies directly into private fields using Reflection (Considered an anti-pattern).
Interview Pro-Tip: Show that your knowledge is fully modernized for enterprise development. Point out that starting with Spring 4.3, if a class only has a single constructor, you can completely omit the
@Autowiredannotation. The framework will automatically use that constructor for injection, keeping your microservice code impeccably clean and perfectly framework-agnostic.
8. How do you resolve ambiguity when multiple beans of the same type exist (@Primary vs @Qualifier)?
Because @Autowired resolves dependencies by type, having multiple beans of the same interface or class in the application context causes Spring to panic and throw a NoUniqueBeanDefinitionException on startup.
You solve this ambiguity using two distinct approaches:
@Primary(The Global Default): Placed directly on a bean definition (or@Componentclass), it tells Spring: “If multiple candidate beans exist, always pick this one by default unless explicitly instructed otherwise.”@Qualifier(The Local Override): Placed alongside@Autowiredat the specific injection point, it instructs Spring to switch from “by type” resolution to “by name” resolution: “I do not care about defaults; inject the specific bean named X.”
Interview Pro-Tip: Interviewers will almost always ask the trap question: “What happens if you use both
@Primaryand@Qualifierfor the same injection?” The definitive answer is that@Qualifieralways wins.@Primaryestablishes a fallback default, but@Qualifieris a strict, localized directive that takes absolute precedence.Real-world example: You mark your main Write database bean as
@Primaryso most services get it automatically, but you use@Qualifier("readOnlyDb")strictly on your reporting services that require the Read-Only replica.
9. What are the different Spring Bean scopes, and what is the difference between Singleton and Prototype?
In Spring, a bean’s scope defines its lifecycle and visibility within the IoC container. You can declare a scope using the @Scope annotation.
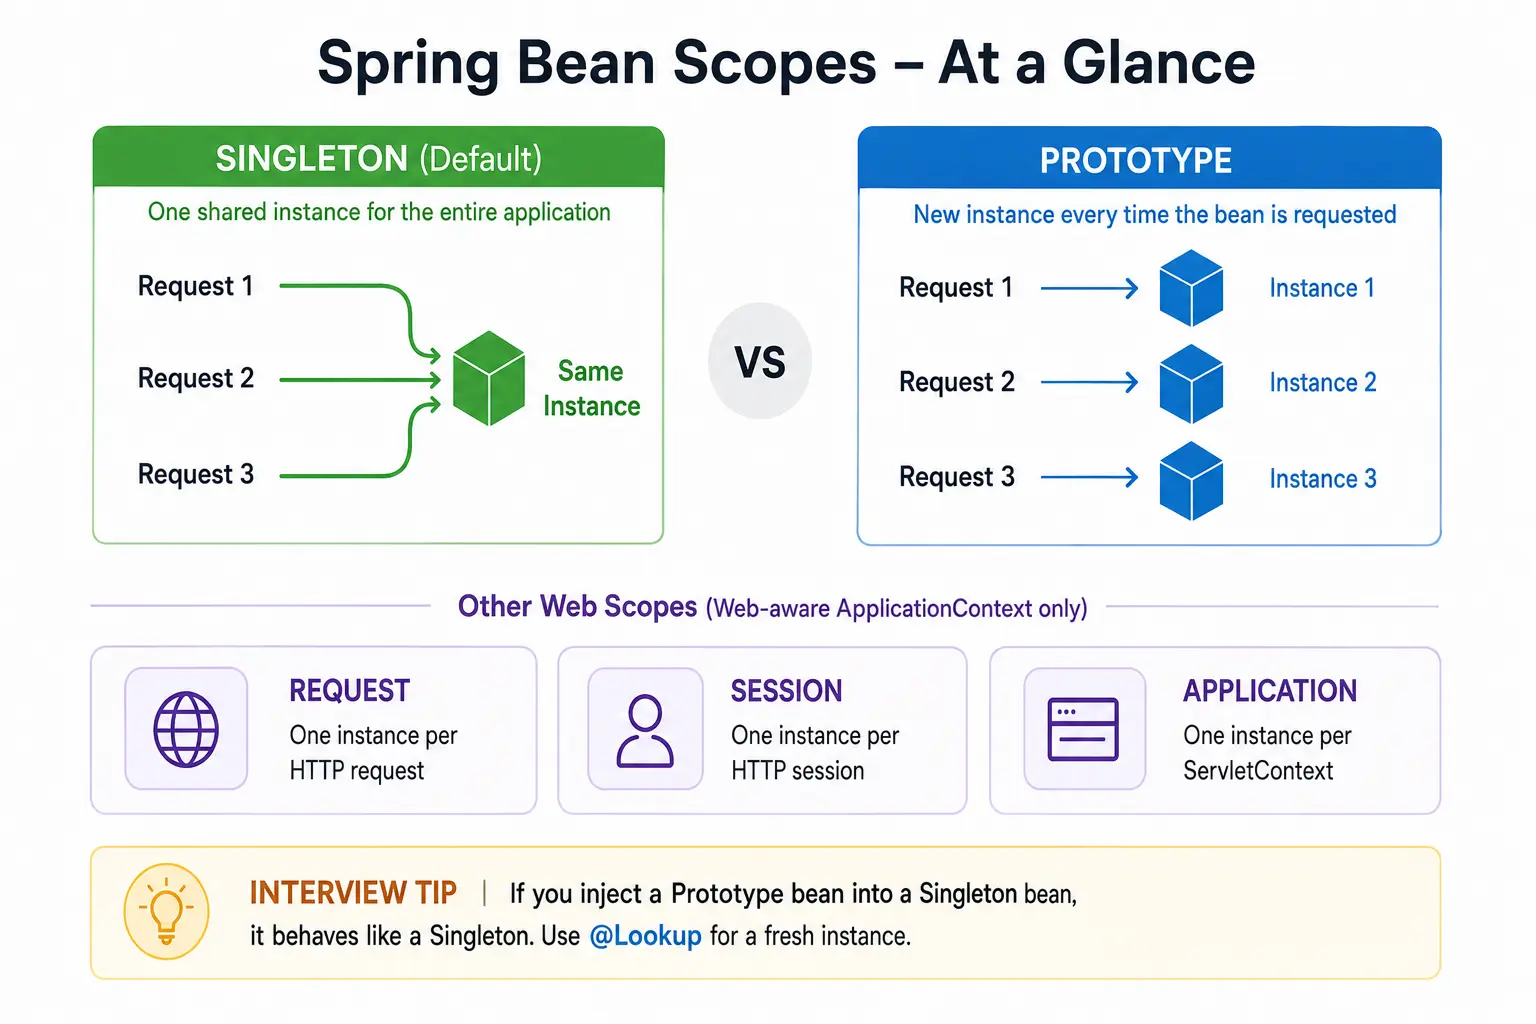
There are five core scopes available, with the first two being the most critical to understand for general architecture:
- Singleton (Default): The Spring container creates exactly one instance of the bean during application startup. Every time the application requests this bean, the container returns the exact same shared instance. This is highly efficient and ideal for stateless components like
@Serviceor@Repositoryclasses. - Prototype: The Spring container creates a brand-new instance of the bean every single time it is requested. This is absolutely necessary for stateful beans that hold specific conversational data, where sharing an instance across multiple threads would lead to data corruption.
The following three scopes are only valid within a web-aware Spring ApplicationContext (like a Spring MVC web application):
- Request: A single instance is created for the lifecycle of an individual HTTP request.
- Session: A single instance is created for the lifecycle of an entire HTTP Session, allowing you to store user-specific state.
- Application: A single instance is created for the lifecycle of a
ServletContext. It is similar to a singleton but is scoped at the web-application level rather than the SpringApplicationContextlevel. (Note: This replaces the legacy “Global Session” scope).
Interview Pro-Tip: Interviewers love asking the “gotcha” question: “What happens if you inject a Prototype bean into a Singleton bean?” The answer is that the Prototype effectively becomes a Singleton. Because the Singleton’s dependencies are only resolved once during its creation, it will hold onto the exact same Prototype instance forever. Mentioning solutions to this problem, like using
@Lookupmethod injection, will instantly prove your senior-level knowledge.
10. What are Spring profiles, and how are they used?
Spring Profiles provide a powerful way to segregate parts of your application configuration and make them available only in specific environments (such as dev, test, or prod). This allows you to safely manage different database connections, external API keys, or logging levels without modifying your core compiled codebase as the application moves through the deployment pipeline.
There are two primary ways to use profiles:
- Via Annotations: You can annotate a
@Configurationclass or a specific@Beanmethod with@Profile("dev"). Spring will only register these beans if thedevprofile is currently active. - Via Properties/YAML Files: In Spring Boot, you can create profile-specific configuration files (e.g.,
application-dev.ymlorapplication-prod.properties) that automatically load when that specific profile is activated.
@Configuration
@Profile("dev")
public class DevConfig {
    @Bean
    public DataSource dataSource() {
        return new HikariDataSource(); // Development-specific database
    }
}You can activate a profile by setting the spring.profiles.active property in your main application.properties, passing it as a JVM command-line argument (-Dspring.profiles.active=prod), or setting an OS environment variable.
Interview Pro-Tip: Give a practical example: Mention how you might use an in-memory H2 database for the
testprofile to run fast unit tests, but switch to a robust PostgreSQL connection pool for theprodprofile—all without changing a single line of Java code.
11. How can you make a Spring bean thread-safe?
By default, Spring beans are Singletons, meaning the exact same instance is shared across multiple concurrent threads. To make a Spring bean thread-safe, you must ensure it can handle this concurrent access without causing race conditions.
- Stateless Beans (Recommended): Design the bean with no mutable internal state. Avoid using class-level variables to store data that changes across requests.
- Immutable State: If the bean must maintain internal state, make that state immutable. Declare instance fields as
finaland initialize them only via the constructor.
Interview Pro-Tip: The absolute best way to make a bean thread-safe is to make it completely stateless. Keep all variable data local to the method execution (on the thread stack) rather than in class-level fields (on the heap).
12. What is Spring Expression Language (SpEL), and where can it be used?
The Spring Expression Language (SpEL) is a powerful expression language that supports querying and manipulating an object graph at runtime. It provides a highly flexible way to inject dynamic behavior into Spring-based applications.
SpEL is primarily used for evaluating dynamic expressions across various Spring features, including annotations, XML/Java configurations, and method invocations. Common use cases include:
- Dependency Injection: Injecting dynamically computed values, system properties, or references to other beans using the
@Valueannotation. - Spring Security: Dynamically evaluating complex access control rules for method-level security (e.g., using
@PreAuthorize("hasRole('ADMIN') and #user.isActive()")). - Caching and Data: Evaluating expressions to dynamically generate cache keys in Spring Cache, or for conditional routing in Spring Integration.
Interview Pro-Tip: A common real-world use case for SpEL that interviewers love to hear about is providing default values if an environment variable is missing. Mention how you safely handle missing configurations using syntax like
@Value("${my.api.key:defaultKey}").
13. How does Spring handle property injection using @Value?
The @Value annotation in Spring is used to inject externalized configuration values directly into a Spring bean’s fields, methods, or constructor parameters. By decoupling hardcoded values from the source code, it makes applications highly flexible and environment-agnostic.
Spring can resolve and inject values from several sources:
- Property Files: Injecting standard keys defined in
application.propertiesorapplication.ymlusing the${...}placeholder syntax. - Environment Variables: Spring automatically checks OS-level environment variables and system properties if a key isn’t found in a properties file.
- Spring Expression Language (SpEL): You can inject dynamically computed values at runtime using the
#{...}SpEL syntax.
@Component
public class DatabaseConfig {

    // Injects a value from application.properties
    @Value("${db.url}")
    private String dbUrl;

    // Injects a value with a default fallback if the key is missing
    @Value("${db.timeout:3000}")
    private int timeout;

    // Evaluates a SpEL expression dynamically
    @Value("#{systemProperties['user.timezone']}")
    private String timeZone;
}Interview Pro-Tip: For modern enterprise applications, point out that using
@ConfigurationPropertiesis highly preferred over scattering dozens of@Valueannotations across your codebase. Tell the interviewer that@ConfigurationPropertiesprovides type safety, validation, and much better organization for complex configurations.
14. How do you resolve circular dependencies in Spring?
A circular dependency occurs when two or more beans depend on each other (e.g., Bean A requires Bean B, and Bean B requires Bean A), creating a closed loop in the dependency graph. When Spring encounters this during context initialization (especially with constructor injection), it cannot determine which bean to create first and throws a BeanCurrentlyInCreationException.
There are three primary ways to resolve a circular dependency:
- Use the
@LazyAnnotation: By applying@Lazyto one of the injected dependencies, Spring will inject a proxy object instead of the fully initialized bean. The actual bean is only instantiated and injected later when it is first accessed, effectively breaking the initialization loop. - Switch to Setter Injection: Constructor injection requires all dependencies to be fully initialized before the object can be created. By switching to setter injection, Spring can instantiate the beans first (using their default constructors) and then inject the dependencies in a secondary phase.
- Redesign the Architecture (Best Practice): Extract the overlapping business logic into a third, independent component (Bean C) that both Bean A and Bean B can depend on without relying on each other.
Interview Pro-Tip: Using
@Lazyor Setter Injection is a handy quick fix for circular dependencies, but during an interview, always mention that a circular dependency usually indicates a design flaw. The best long-term solution is to refactor the code and decouple the components.
15. Explain the use of the @Lazy annotation.
In Spring, the ApplicationContext uses eager initialization for singleton beans by default, meaning they are created and configured immediately when the application starts. The @Lazy annotation alters this behavior, instructing the container to delay the initialization of the bean until the exact moment it is explicitly requested.
There are two primary reasons to use @Lazy:
- Startup Optimization: For beans that are incredibly resource-intensive to create (like heavy cache warmers, large file parsers, or complex external API connections), lazy initialization can significantly reduce application startup time and initial memory footprint.
- Breaking Circular Dependencies: If Bean A and Bean B tightly depend on each other, annotating one of the injected dependencies with
@Lazytells Spring to inject a proxy object instead of the fully instantiated bean. The actual bean is only created when a method is invoked on that proxy later on, effectively breaking the initialization loop.
Interview Pro-Tip: While
@Lazysounds great for performance, tell the interviewer that you generally avoid using it globally. A major benefit of Spring’s default eager initialization is the “fail-fast” principle—if a bean is misconfigured, the application crashes immediately on startup. Overusing@Lazyhides these configuration errors until the bean is first accessed at runtime, which could result in a catastrophic crash in production hours later.
16. How does Spring handle externalized configuration?
Spring embraces the “12-Factor App” methodology, which states that configuration should be strictly separated from code. This allows you to deploy the exact same compiled application across multiple environments (Dev, QA, Prod) simply by swapping out the external configuration.
Spring handles this through a highly flexible Environment abstraction and a robust PropertySource mechanism.
Common Sources of External Configuration:
- Properties/YAML Files: Standard
application.propertiesorapplication.ymlfiles packaged within the application, or externalized on the host system. - Environment Variables: OS-level environment variables (highly common in containerized environments like Docker/Kubernetes).
- Command-Line Arguments: Arguments passed directly to the JVM at startup (e.g.,
--server.port=8081).
How to Consume External Configuration:
@ValueAnnotation: Injects individual property values directly into bean fields (supports SpEL and default fallbacks).@ConfigurationProperties: Binds a hierarchical group of properties to a strongly-typed Java POJO. This is the modern best practice for complex configurations because it provides type safety and validation.EnvironmentInterface: You can inject Spring’sEnvironmentobject directly to fetch properties programmatically (e.g.,env.getProperty("my.key")).
Interview Pro-Tip: Interviewers love asking about the Order of Precedence. You should mention that Spring evaluates these sources in a specific, strict order. For example, Command-Line Arguments will always override OS Environment Variables, which will always override values found in an
application.propertiesfile.
17. What is the @Conditional annotation, and how does it enhance bean registration?
The @Conditional annotation provides a way to conditionally register beans in the Spring IoC container based on dynamic, runtime evaluations. If the specified condition evaluates to true, the bean is created and registered; if false, the bean is completely ignored.
This greatly enhances flexibility by allowing developers to enable or disable features based on the environment without changing the source code.
How it works: Under the hood, @Conditional relies on a custom class that implements Spring’s Condition interface. The framework invokes the matches() method on this class, which contains the logic to return true or false based on environment variables, system properties, or class availability.
Common Use Cases (via Spring Boot): While you can write custom conditions, Spring Boot provides a massive suite of built-in @Conditional derivatives that power its Auto-Configuration engine, such as:
@ConditionalOnProperty: Loads a bean only if a specific property is set (e.g.,feature.toggle.enabled=true).@ConditionalOnClass: Loads a bean only if a specific class is present on the classpath.@ConditionalOnMissingBean: Loads a default bean only if the developer hasn’t already defined a bean of that same type.
Interview Pro-Tip: When asked this question, immediately pivot to Spring Boot Auto-Configuration. Tell the interviewer that
@Conditionalis the absolute backbone of Spring Boot. It is the exact mechanism that allows Boot to automatically configure a Tomcat server or an in-memory database simply by detecting those libraries on the classpath.
18. What is the purpose of the @DependsOn annotation in Spring? When should it be used?
The @DependsOn annotation is used to force the Spring IoC container to initialize one or more specific beans before the bean currently being created.
While Spring is generally smart enough to automatically calculate the correct initialization order based on your @Autowired or constructor injections, @DependsOn becomes necessary when you have implicit dependencies (also known as indirect dependencies).
When to use it: You use @DependsOn when Bean A relies on Bean B completing some setup or side effect, but Bean A does not directly inject Bean B. Common scenarios include:
- Database Initialization: Ensuring a database schema is created or migrated (e.g., via Liquibase or Flyway) before the
EntityManageror DAO beans attempt to connect to it. - Static Caches: Forcing a configuration bean to load and populate a static cache or system properties before another bean tries to read those values during its
@PostConstructphase.
Interview Pro-Tip: Interviewers look for developers who know when not to use a feature. Tell them that while
@DependsOnis a useful tool, you treat it as a last resort. In modern Spring applications, relying on implicit dependencies or global static state is often a sign of poor architectural design.
19. What is the @PropertySource annotation, and how is it used to load properties files?
In Spring, the @PropertySource annotation provides a convenient, declarative mechanism for adding custom property files to Spring’s global Environment.
While Spring Boot automatically loads application.properties by default, you use @PropertySource when you want to externalize specific configurations into separate, custom files (e.g., database.properties or email.properties) and inject those values into your beans using the @Value annotation.
Example Usage:
1. The Properties File (custom.properties):
# custom.properties
custom.dir=MyDir
custom.file=readme2. The Configuration Class:
import org.springframework.context.annotation.Bean;
import org.springframework.context.annotation.Configuration;
import org.springframework.context.annotation.PropertySource;
import org.springframework.beans.factory.annotation.Value;

@Configuration
@PropertySource("classpath:custom.properties")  // Specify the path to the properties file
public class AppConfig {

    @Value("${custom.dir}")
    private String dirName;

    @Value("${custom.file}")
    private String fileName;

    public void printFileDetails() {
        System.out.println("Dir Name: " + dirName);
        System.out.println("File Name: " + fileName);
    }
}Interview Pro-Tip: A great detail to mention during an interview is the
ignoreResourceNotFoundattribute. By default, if the file specified in@PropertySourceis missing, the application will crash on startup. You can tell the interviewer that you use@PropertySource(value = "classpath:custom.properties", ignoreResourceNotFound = true)to prevent crashes if that specific file is optional for the current environment.
20. What is @ConfigurationProperties, how you bind the external properties to Java Object?
The @ConfigurationProperties annotation in Spring is used to map, or “bind,” a hierarchical group of external properties (from application.properties or application.yml) into a strongly-typed Java POJO.
Unlike the @Value annotation—which injects properties one by one—@ConfigurationProperties provides a structured, type-safe, and highly maintainable way to manage complex configuration data.
How to bind external properties: To achieve this, you define a prefix in the annotation that matches the property structure, and Spring will automatically map the nested properties to the class fields using standard Java setters.
1. External Properties (application.properties):
#application.yml

app:
  name: MyApp
  version: 1.0.0
  features:
    enable: true
    maxUsers: 100

dev:
port: 30302. The Java Object:
import org.springframework.boot.context.properties.ConfigurationProperties;
import org.springframework.stereotype.Component;

@Component
@ConfigurationProperties(prefix = "app")
public class AppProperties {

    private String name;
    private String version;
    private Features features;

    public static class Features {
        private boolean enable;
        private int maxUsers;

        // Getters and setters
    }

    // Getters and setters for name, version, and features
}Interview Pro-Tip: A massive advantage of
@ConfigurationPropertiesover@Valueis Validation. Tell the interviewer that you combine@ConfigurationPropertieswith@Validatedand standard JSR-303 annotations (like@NotNull,@Min,@Max) directly on the POJO fields. This ensures the application adheres to the “fail-fast” principle by crashing immediately on startup if a critical configuration value is missing or formatted incorrectly in the production environment.
We hope that this list of interview questions and responses has strengthened your grasp of the framework. Make sure to continue your exploration, work with real-world examples, and keep up with the most recent advancements in Spring. Happy coding and best of luck on your Spring Core interview.
For a deeper understanding of Spring, consider enrolling in our Online Spring Framework Training.
Acknowledgments
The content of this article is inspired by the official Spring Framework documentation. I appreciate the comprehensive resources provided by the Spring team, which greatly helped in creating this list of interview questions.
Very Useful.
Really useful for interview prep. Thanks a lot!